Set up Maester in GitHub
This guide will walk you through setting up Maester in GitHub and automate the running of tests using GitHub Actions.
Why GitHub?
GitHub is the quickest and easiest way to get started with automating Maester. The free tier includes 2,000 minutes per month for private repositories which is more than enough to run your Maester tests daily.
Set up your Maester tests repository in GitHub
Pre-requisites
- If you are new to GitHub, create an account at github.com
Create a new GitHub repository
- Open https://github.com/new
- Fill in the following fields:
- Repository name: E.g.
maester-tests - Private: Select this option to keep your tests private
- Repository name: E.g.
- Select Create repository
Set up the GitHub Actions workflow
There are many ways to authenticate with Microsoft Entra from GitHub Actions. We recommend using workload identity federation as it is more secure, requires less maintenance and is the easiest to set up.
If you’re unable to use more advanced options like certificates stored in Azure Key Vault, which need an Azure subscription, there’s also guidance available for using client secrets.
- Workload identity federation (recommended) uses OpenID Connect (OIDC) to authenticate with Microsoft Entra protected resources without using secrets.
- Client secret uses a secret to authenticate with Microsoft Entra protected resources.
- GitHub Action using Workload identity federation (recommended)
- Custom workflow using Workload identity federation
- Custom workflow using Client secret
This guide is based on Use GitHub Actions to connect to Azure and uses the maester GitHub action.
Pre-requisites Workload identity federation
Create an Entra Application
- Open Entra admin center > Identity > Applications > App registrations
- Tip: enappreg.cmd.ms is a shortcut to the App registrations page.
- Select New registration
- Enter a name for the application (e.g.
Maester DevOps Account) - Select Register
Grant permissions to Microsoft Graph
- Open the application you created in the previous step
- Select API permissions > Add a permission
- Select Microsoft Graph > Application permissions
- Search for each of the permissions and check the box next to each permission:
- DeviceManagementConfiguration.Read.All
- DeviceManagementManagedDevices.Read.All
- DeviceManagementRBAC.Read.All
- DeviceManagementServiceConfig.Read.All
- Directory.Read.All
- DirectoryRecommendations.Read.All
- IdentityRiskEvent.Read.All
- OnPremDirectorySynchronization.Read.All
- Policy.Read.All
- Policy.Read.ConditionalAccess
- PrivilegedAccess.Read.AzureAD
- Reports.Read.All
- ReportSettings.Read.All
- RoleEligibilitySchedule.Read.Directory
- RoleManagement.Read.All
- SecurityIdentitiesSensors.Read.All
- SecurityIdentitiesHealth.Read.All
- SharePointTenantSettings.Read.All
- ThreatHunting.Read.All
- UserAuthenticationMethod.Read.All
- Optionally, search for each of the permissions if you want to allow privileged permissions:
- ReportSettings.ReadWrite.All
- Required to disable report obfuscation
- ReportSettings.ReadWrite.All
- Select Add permissions
- Select Grant admin consent for [your organization]
- Select Yes to confirm
(Optional) Grant permissions to Exchange Online
(Optional) Grant permissions to Exchange Online
The Exchange Online Role Based Access Control (RBAC) implementation utilizes service specific roles that apply to an application and the below configuration allows the authorization chain to the App Registration you created in the previous steps.
The Exchange Online permissions are necessary to support tests that validate Exchange Online configurations, such as the CISA tests.
- Open the application you created in the previous step
- Select API permissions > Add a permission
- Select APIs that my organization uses > search for Office 365 Exchange Online > Application permissions
- Search for
Exchange.ManageAsApp - Select Add permissions
- Select Grant admin consent for [your organization]
- Select Yes to confirm
- Connect to the Exchange Online Management tools and use the following to set the appropriate permissions:
New-ServicePrincipal -AppId <Application ID> -ObjectId <Object ID> -DisplayName <Name>
New-ManagementRoleAssignment -Role "View-Only Configuration" -App <DisplayName from previous command>
(Optional) Grant permissions to Teams
(Optional) Grant permissions to Teams
The Teams Role Based Access Control (RBAC) implementation utilizes service specific roles that apply to an application and the below configuration allows the authorization chain to the App Registration you created in the previous steps.
The Teams permissions are necessary to support tests that validate Teams configurations.
- Open Roles and administrators
- Search and select Teams Reader
- Select Add assigment
- Select No member selected
- Search for the name of previously created application
- Select previously created application and select Select to confirm
- Select Next to confirm
- Ensure that Active and Permanently assigned are ticked
- Enter Justification
- Select Assign to confirm
(Optional) Grant permissions to Azure
(Optional) Grant permissions to Azure
The Azure Role Based Access Control (RBAC) implementation utilizes Uniform Resource Names (URN) with a "/" separator for heirarchical scoping. There exists resources within the root (e.g., "/") scope that Microsoft retains strict control over by limiting supported interactions. As a Global Administrator you can elevate access to become authorized for these limited interactions.
The Azure RBAC permissions are necessary to support tests that validate Azure configurations, such as the CISA tests.
The following PowerShell script will enable you, with a Global Administrator role assignment, to:
- Identify the Service Principal Object ID that will be authorized as a Reader (Enterprise app Object ID)
- Install the necessary Az module and prompt for connection
- Elevate your account access to the root scope
- Create a role assignment for Reader access over the Root Scope
- Create a role assignment for Reader access over the Entra ID (i.e., aadiam provider)
- Identify the role assignment authorizing your account access to the root scope
- Delete the root scope role assignment for your account
$servicePrincipal = "<Object ID of the Entra App>"
$subscription = "<Subscription ID>"
Install-Module Az.Accounts -Force
Install-Module Az.Resources -Force
Connect-AzAccount
#Elevate to root scope access
$elevateAccess = Invoke-AzRestMethod -Path "/providers/Microsoft.Authorization/elevateAccess?api-version=2015-07-01" -Method POST

#Assign permissions to Enterprise App
New-AzRoleAssignment -ObjectId $servicePrincipal -Scope "/" -RoleDefinitionName "Reader" -ObjectType "ServicePrincipal"
New-AzRoleAssignment -ObjectId $servicePrincipal -Scope "/providers/Microsoft.aadiam" -RoleDefinitionName "Reader" -ObjectType "ServicePrincipal"

#Remove root scope access
$assignment = Get-AzRoleAssignment -RoleDefinitionId 18d7d88d-d35e-4fb5-a5c3-7773c20a72d9|?{$_.Scope -eq "/" -and $_.SignInName -eq (Get-AzContext).Account.Id}
$deleteAssignment = Invoke-AzRestMethod -Path "$($assignment.RoleAssignmentId)?api-version=2018-07-01" -Method DELETE
(Optional) Grant Dataverse permissions for Copilot Studio tests
(Optional) Grant Dataverse permissions for Copilot Studio
Dataverse access is required for the Copilot Studio security tests (MT.1113–MT.1122) that evaluate Copilot Studio agent configurations.
Create an Application User in Power Platform
- Go to the Power Platform Admin Center → select your environment → Settings → Users + permissions → Application users
- Click New app user → Add an app → select the app registration created above
- Select the correct Business unit
- Assign a security role with read access:
- Basic User for simplicity, or
- A custom role (e.g.
Maester Security Reader) with Organization-level Read on: Agent (bot), Agent component (botcomponent), User (systemuser), and Connection Reference (connectionreference)
- Click Create
Configure Maester
Add the environment URL to maester-config.json:
{
  "GlobalSettings": {
    "DataverseEnvironmentUrl": "https://org12345.crm.dynamics.com"
  }
}
Add federated credentials
- Select Certificates & secrets
- Select Federated credentials, select Add credential
- For Federated credential scenario, select GitHub Actions deploying Azure resources
- Fill in the following fields
- Organization: Your GitHub organization name or GitHub username. E.g.
jasonf - Repository: Your GitHub repository name (from the previous step). E.g.
maester-tests - Entity type:
Branch - GitHub branch name:
main - Credential details > Name: E.g.
maester-devops
- Organization: Your GitHub organization name or GitHub username. E.g.
- Select Add
Add Entra tenant info to GitHub repo
- Open your
maester-testsGitHub repository and go to Settings - Select Security > Secrets and variables > Actions
- Add the secrets listed below by selecting New repository secret
- To look up these values you will need to use the Entra portal, open the application you created earlier and copy the following values from the Overview page:
- Name: AZURE_TENANT_ID, Value: The Directory (tenant) ID of the Entra tenant
- Name: AZURE_CLIENT_ID, Value: The Application (client) ID of the Entra application you created
- Save each secret by selecting Add secret.
Create GitHub Action worklow for Maester
- Open your
maester-testsGitHub repository and go to Actions - Select Skip this and set up a workflow yourself
- Copy and paste the code below into the editor
- Select Commit changes... to save the workflow
- Select Actions > maester-daily-tests to view the status of the pipeline
name: Run Maester 🔥

on:
  push:
    branches:
      - main

  schedule:
    # Daily at 7:30 UTC, change accordingly
    - cron: "30 7 * * *"

  # Allows to run this workflow manually from the Actions tab
  workflow_dispatch:

jobs:
  test:
    runs-on: ubuntu-latest
    permissions:
      id-token: write
      contents: read

    steps:
      - name: Run Maester 🔥
        id: maester
        # Set the action version to a specific version, to keep using that exact version.
        uses: maester365/maester-action@main
        with:
          tenant_id: ${{ secrets.AZURE_TENANT_ID }}
          client_id: ${{ secrets.AZURE_CLIENT_ID }}
          include_public_tests: true
          include_private_tests: false
          include_exchange: false
          include_teams: false
          # Set a specific version of the powershell module here or 'latest' or 'preview'
          # check out https://www.powershellgallery.com/packages/Maester/
          maester_version: latest
          disable_telemetry: false
          step_summary: true

      - name: Write status 📃
        shell: bash
        run: |
          echo "The result of the test run is: ${{ steps.maester.outputs.result }}"
          echo "Total tests: ${{ steps.maester.outputs.tests_total }}"
          echo "Passed tests: ${{ steps.maester.outputs.tests_passed }}"
          echo "Failed tests: ${{ steps.maester.outputs.tests_failed }}"
          echo "Skipped tests: ${{ steps.maester.outputs.tests_skipped }}"
This guide is based on Use GitHub Actions to connect to Azure
Pre-requisites
- An Azure subscription is required for this method. This Azure subscription is required to set up workload identity federation authentication. No Azure resources will be created and there are no costs associated with it.
- If you don't have an Azure subscription, you can create one by following Create a Microsoft Customer Agreement subscription or ask your Azure administrator to create one.
Create an Entra Application
- Open Entra admin center > Identity > Applications > App registrations
- Tip: enappreg.cmd.ms is a shortcut to the App registrations page.
- Select New registration
- Enter a name for the application (e.g.
Maester DevOps Account) - Select Register
Grant permissions to Microsoft Graph
- Open the application you created in the previous step
- Select API permissions > Add a permission
- Select Microsoft Graph > Application permissions
- Search for each of the permissions and check the box next to each permission:
- DeviceManagementConfiguration.Read.All
- DeviceManagementManagedDevices.Read.All
- DeviceManagementRBAC.Read.All
- DeviceManagementServiceConfig.Read.All
- Directory.Read.All
- DirectoryRecommendations.Read.All
- IdentityRiskEvent.Read.All
- OnPremDirectorySynchronization.Read.All
- Policy.Read.All
- Policy.Read.ConditionalAccess
- PrivilegedAccess.Read.AzureAD
- Reports.Read.All
- ReportSettings.Read.All
- RoleEligibilitySchedule.Read.Directory
- RoleManagement.Read.All
- SecurityIdentitiesSensors.Read.All
- SecurityIdentitiesHealth.Read.All
- SharePointTenantSettings.Read.All
- ThreatHunting.Read.All
- UserAuthenticationMethod.Read.All
- Optionally, search for each of the permissions if you want to allow privileged permissions:
- ReportSettings.ReadWrite.All
- Required to disable report obfuscation
- ReportSettings.ReadWrite.All
- Select Add permissions
- Select Grant admin consent for [your organization]
- Select Yes to confirm
(Optional) Grant permissions to Exchange Online
(Optional) Grant permissions to Exchange Online
The Exchange Online Role Based Access Control (RBAC) implementation utilizes service specific roles that apply to an application and the below configuration allows the authorization chain to the App Registration you created in the previous steps.
The Exchange Online permissions are necessary to support tests that validate Exchange Online configurations, such as the CISA tests.
- Open the application you created in the previous step
- Select API permissions > Add a permission
- Select APIs that my organization uses > search for Office 365 Exchange Online > Application permissions
- Search for
Exchange.ManageAsApp - Select Add permissions
- Select Grant admin consent for [your organization]
- Select Yes to confirm
- Connect to the Exchange Online Management tools and use the following to set the appropriate permissions:
New-ServicePrincipal -AppId <Application ID> -ObjectId <Object ID> -DisplayName <Name>
New-ManagementRoleAssignment -Role "View-Only Configuration" -App <DisplayName from previous command>
(Optional) Grant permissions to Teams
(Optional) Grant permissions to Teams
The Teams Role Based Access Control (RBAC) implementation utilizes service specific roles that apply to an application and the below configuration allows the authorization chain to the App Registration you created in the previous steps.
The Teams permissions are necessary to support tests that validate Teams configurations.
- Open Roles and administrators
- Search and select Teams Reader
- Select Add assigment
- Select No member selected
- Search for the name of previously created application
- Select previously created application and select Select to confirm
- Select Next to confirm
- Ensure that Active and Permanently assigned are ticked
- Enter Justification
- Select Assign to confirm
(Optional) Grant permissions to Azure
(Optional) Grant permissions to Azure
The Azure Role Based Access Control (RBAC) implementation utilizes Uniform Resource Names (URN) with a "/" separator for heirarchical scoping. There exists resources within the root (e.g., "/") scope that Microsoft retains strict control over by limiting supported interactions. As a Global Administrator you can elevate access to become authorized for these limited interactions.
The Azure RBAC permissions are necessary to support tests that validate Azure configurations, such as the CISA tests.
The following PowerShell script will enable you, with a Global Administrator role assignment, to:
- Identify the Service Principal Object ID that will be authorized as a Reader (Enterprise app Object ID)
- Install the necessary Az module and prompt for connection
- Elevate your account access to the root scope
- Create a role assignment for Reader access over the Root Scope
- Create a role assignment for Reader access over the Entra ID (i.e., aadiam provider)
- Identify the role assignment authorizing your account access to the root scope
- Delete the root scope role assignment for your account
$servicePrincipal = "<Object ID of the Entra App>"
$subscription = "<Subscription ID>"
Install-Module Az.Accounts -Force
Install-Module Az.Resources -Force
Connect-AzAccount
#Elevate to root scope access
$elevateAccess = Invoke-AzRestMethod -Path "/providers/Microsoft.Authorization/elevateAccess?api-version=2015-07-01" -Method POST

#Assign permissions to Enterprise App
New-AzRoleAssignment -ObjectId $servicePrincipal -Scope "/" -RoleDefinitionName "Reader" -ObjectType "ServicePrincipal"
New-AzRoleAssignment -ObjectId $servicePrincipal -Scope "/providers/Microsoft.aadiam" -RoleDefinitionName "Reader" -ObjectType "ServicePrincipal"

#Remove root scope access
$assignment = Get-AzRoleAssignment -RoleDefinitionId 18d7d88d-d35e-4fb5-a5c3-7773c20a72d9|?{$_.Scope -eq "/" -and $_.SignInName -eq (Get-AzContext).Account.Id}
$deleteAssignment = Invoke-AzRestMethod -Path "$($assignment.RoleAssignmentId)?api-version=2018-07-01" -Method DELETE
(Optional) Grant Dataverse permissions for Copilot Studio tests
(Optional) Grant Dataverse permissions for Copilot Studio
Dataverse access is required for the Copilot Studio security tests (MT.1113–MT.1122) that evaluate Copilot Studio agent configurations.
Create an Application User in Power Platform
- Go to the Power Platform Admin Center → select your environment → Settings → Users + permissions → Application users
- Click New app user → Add an app → select the app registration created above
- Select the correct Business unit
- Assign a security role with read access:
- Basic User for simplicity, or
- A custom role (e.g.
Maester Security Reader) with Organization-level Read on: Agent (bot), Agent component (botcomponent), User (systemuser), and Connection Reference (connectionreference)
- Click Create
Configure Maester
Add the environment URL to maester-config.json:
{
  "GlobalSettings": {
    "DataverseEnvironmentUrl": "https://org12345.crm.dynamics.com"
  }
}
Add federated credentials
- Select Certificates & secrets
- Select Federated credentials, select Add credential
- For Federated credential scenario, select GitHub Actions deploying Azure resources
- Fill in the following fields
- Organization: Your GitHub organization name or GitHub username. E.g.
jasonf - Repository: Your GitHub repository name (from the previous step). E.g.
maester-tests - Entity type:
Branch - GitHub branch name:
main - Credential details > Name: E.g.
maester-devops
- Organization: Your GitHub organization name or GitHub username. E.g.
- Select Add
Create GitHub secrets
- Open your
maester-testsGitHub repository and go to Settings - Select Security > Secrets and variables > Actions
- Add the secrets listed below by selecting New repository secret
- To look up these values you will need to use the Entra portal, open the application you created earlier and copy the following values from the Overview page:
- Name: AZURE_TENANT_ID, Value: The Directory (tenant) ID of the Entra tenant
- Name: AZURE_CLIENT_ID, Value: The Application (client) ID of the Entra application you created
- Save each secret by selecting Add secret.
Create GitHub Action worklow for Maester
- Open your
maester-testsGitHub repository and go to Actions - Select Skip this and set up a workflow yourself
- Copy and paste the code below into the editor
- Select Commit changes... to save the workflow
- Select Actions > maester-daily-tests to view the status of the pipeline
name: Maester Daily Tests

on:
  push:
    branches: ["main"]
  # Run once a day at midnight
  schedule:
    - cron: "0 0 * * *"
  # Allows to run this workflow manually from the Actions tab
  workflow_dispatch:

permissions:
      id-token: write
      contents: read
      checks: write

jobs:
  run-maester-tests:
    name: Run Maester Tests
    runs-on: ubuntu-latest
    steps:
    - uses: actions/checkout@v4
    - name: Set current date as env variable
      run: echo "NOW=$(date +'%Y-%m-%d-T%H%M%S')" >> $GITHUB_ENV
    - name: 'Az CLI login'
      uses: azure/login@v2
      with:
          tenant-id: ${{ secrets.AZURE_TENANT_ID }}
          client-id: ${{ secrets.AZURE_CLIENT_ID }}
          allow-no-subscriptions: true
    - name: Run Maester
      uses: azure/powershell@v2
      with:
        inlineScript: |
          # Get Token
          $token = az account get-access-token --resource-type ms-graph

          # Connect to Microsoft Graph
          $accessToken = ($token | ConvertFrom-Json).accessToken | ConvertTo-SecureString -AsPlainText -Force
          Connect-MgGraph -AccessToken $accessToken

          # Install Maester
          Install-Module Maester -Force

          # Install Tests
          Install-MaesterTests -Path ./tests

          # Configure test results
          $PesterConfiguration = New-PesterConfiguration
          $PesterConfiguration.Output.Verbosity = 'None'

          # Run Maester tests
          $results = Invoke-Maester -Path ./tests -PesterConfiguration $PesterConfiguration -OutputFolder test-results -OutputFolderFileName "test-results" -PassThru

          # Add step summary
          $summary = Get-Content test-results/test-results.md
          Add-Content -Path $env:GITHUB_STEP_SUMMARY -Value $summary

          # Flag status to GitHub - Uncomment the block below to fail the build if tests fail
          #if ($results.Result -ne 'Passed'){
          #  Write-Error "Status = $($results.Result): See Maester Test Report below for details."
          #}
        azPSVersion: "latest"

    - name: Archive Maester Html Report
      uses: actions/upload-artifact@v4
      if: always()
      with:
        name: maester-test-results-${{ env.NOW }}
        path: test-results
Create an Entra Application
- Open Entra admin center > Identity > Applications > App registrations
- Tip: enappreg.cmd.ms is a shortcut to the App registrations page.
- Select New registration
- Enter a name for the application (e.g.
Maester DevOps Account) - Select Register
Grant permissions to Microsoft Graph
- Open the application you created in the previous step
- Select API permissions > Add a permission
- Select Microsoft Graph > Application permissions
- Search for each of the permissions and check the box next to each permission:
- DeviceManagementConfiguration.Read.All
- DeviceManagementManagedDevices.Read.All
- DeviceManagementRBAC.Read.All
- DeviceManagementServiceConfig.Read.All
- Directory.Read.All
- DirectoryRecommendations.Read.All
- IdentityRiskEvent.Read.All
- OnPremDirectorySynchronization.Read.All
- Policy.Read.All
- Policy.Read.ConditionalAccess
- PrivilegedAccess.Read.AzureAD
- Reports.Read.All
- ReportSettings.Read.All
- RoleEligibilitySchedule.Read.Directory
- RoleManagement.Read.All
- SecurityIdentitiesSensors.Read.All
- SecurityIdentitiesHealth.Read.All
- SharePointTenantSettings.Read.All
- ThreatHunting.Read.All
- UserAuthenticationMethod.Read.All
- Optionally, search for each of the permissions if you want to allow privileged permissions:
- ReportSettings.ReadWrite.All
- Required to disable report obfuscation
- ReportSettings.ReadWrite.All
- Select Add permissions
- Select Grant admin consent for [your organization]
- Select Yes to confirm
(Optional) Grant permissions to Exchange Online
(Optional) Grant permissions to Exchange Online
The Exchange Online Role Based Access Control (RBAC) implementation utilizes service specific roles that apply to an application and the below configuration allows the authorization chain to the App Registration you created in the previous steps.
The Exchange Online permissions are necessary to support tests that validate Exchange Online configurations, such as the CISA tests.
- Open the application you created in the previous step
- Select API permissions > Add a permission
- Select APIs that my organization uses > search for Office 365 Exchange Online > Application permissions
- Search for
Exchange.ManageAsApp - Select Add permissions
- Select Grant admin consent for [your organization]
- Select Yes to confirm
- Connect to the Exchange Online Management tools and use the following to set the appropriate permissions:
New-ServicePrincipal -AppId <Application ID> -ObjectId <Object ID> -DisplayName <Name>
New-ManagementRoleAssignment -Role "View-Only Configuration" -App <DisplayName from previous command>
(Optional) Grant permissions to Teams
(Optional) Grant permissions to Teams
The Teams Role Based Access Control (RBAC) implementation utilizes service specific roles that apply to an application and the below configuration allows the authorization chain to the App Registration you created in the previous steps.
The Teams permissions are necessary to support tests that validate Teams configurations.
- Open Roles and administrators
- Search and select Teams Reader
- Select Add assigment
- Select No member selected
- Search for the name of previously created application
- Select previously created application and select Select to confirm
- Select Next to confirm
- Ensure that Active and Permanently assigned are ticked
- Enter Justification
- Select Assign to confirm
(Optional) Grant permissions to Azure
(Optional) Grant permissions to Azure
The Azure Role Based Access Control (RBAC) implementation utilizes Uniform Resource Names (URN) with a "/" separator for heirarchical scoping. There exists resources within the root (e.g., "/") scope that Microsoft retains strict control over by limiting supported interactions. As a Global Administrator you can elevate access to become authorized for these limited interactions.
The Azure RBAC permissions are necessary to support tests that validate Azure configurations, such as the CISA tests.
The following PowerShell script will enable you, with a Global Administrator role assignment, to:
- Identify the Service Principal Object ID that will be authorized as a Reader (Enterprise app Object ID)
- Install the necessary Az module and prompt for connection
- Elevate your account access to the root scope
- Create a role assignment for Reader access over the Root Scope
- Create a role assignment for Reader access over the Entra ID (i.e., aadiam provider)
- Identify the role assignment authorizing your account access to the root scope
- Delete the root scope role assignment for your account
$servicePrincipal = "<Object ID of the Entra App>"
$subscription = "<Subscription ID>"
Install-Module Az.Accounts -Force
Install-Module Az.Resources -Force
Connect-AzAccount
#Elevate to root scope access
$elevateAccess = Invoke-AzRestMethod -Path "/providers/Microsoft.Authorization/elevateAccess?api-version=2015-07-01" -Method POST

#Assign permissions to Enterprise App
New-AzRoleAssignment -ObjectId $servicePrincipal -Scope "/" -RoleDefinitionName "Reader" -ObjectType "ServicePrincipal"
New-AzRoleAssignment -ObjectId $servicePrincipal -Scope "/providers/Microsoft.aadiam" -RoleDefinitionName "Reader" -ObjectType "ServicePrincipal"

#Remove root scope access
$assignment = Get-AzRoleAssignment -RoleDefinitionId 18d7d88d-d35e-4fb5-a5c3-7773c20a72d9|?{$_.Scope -eq "/" -and $_.SignInName -eq (Get-AzContext).Account.Id}
$deleteAssignment = Invoke-AzRestMethod -Path "$($assignment.RoleAssignmentId)?api-version=2018-07-01" -Method DELETE
(Optional) Grant Dataverse permissions for Copilot Studio tests
(Optional) Grant Dataverse permissions for Copilot Studio
Dataverse access is required for the Copilot Studio security tests (MT.1113–MT.1122) that evaluate Copilot Studio agent configurations.
Create an Application User in Power Platform
- Go to the Power Platform Admin Center → select your environment → Settings → Users + permissions → Application users
- Click New app user → Add an app → select the app registration created above
- Select the correct Business unit
- Assign a security role with read access:
- Basic User for simplicity, or
- A custom role (e.g.
Maester Security Reader) with Organization-level Read on: Agent (bot), Agent component (botcomponent), User (systemuser), and Connection Reference (connectionreference)
- Click Create
Configure Maester
Add the environment URL to maester-config.json:
{
  "GlobalSettings": {
    "DataverseEnvironmentUrl": "https://org12345.crm.dynamics.com"
  }
}
Create a client secret
- Select Certificates & secrets > Client secrets > New client secret
- Enter a description for the secret (e.g.
Maester DevOps Secret) - Select Add
- Copy the value of the secret, we will use this value in the Azure Pipeline
Create GitHub secrets
- Open your
maester-testsGitHub repository and go to Settings - Select Security > Secrets and variables > Actions
- Add the three secrets listed below by selecting New repository secret
- To look up these values you will need to use the Entra portal, open the application you created earlier and copy the following values from the Overview page:
- Name: AZURE_TENANT_ID, Value: The Directory (tenant) ID of the Entra tenant
- Name: AZURE_CLIENT_ID, Value: The Application (client) ID of the Entra application you created
- Name: AZURE_CLIENT_SECRET, Value: The client secret you copied in the previous step
- Save each secret by selecting Add secret.
Create GitHub Action worklow for Maester
- Open your
maester-testsGitHub repository and go to Actions - Select Skip this and set up a workflow yourself
- Copy and paste the code below into the editor
- Select Commit changes... to save the workflow
- Select Actions > maester-daily-tests to view the status of the pipeline
name: Maester Daily Tests

on:
  push:
    branches: ["main"]
  # Run once a day at midnight
  schedule:
    - cron: "0 0 * * *"
  # Allows to run this workflow manually from the Actions tab
  workflow_dispatch:

permissions:
      id-token: write
      contents: read
      checks: write

jobs:
  run-maester-tests:
    name: Run Maester Tests
    runs-on: ubuntu-latest
    steps:
    - uses: actions/checkout@v4
    - name: Set current date as env variable
      run: echo "NOW=$(date +'%Y-%m-%d-T%H%M%S')" >> $GITHUB_ENV
    - name: Run Maester
      shell: pwsh
      env:
        TENANTID: ${{ secrets.AZURE_TENANT_ID }}
        CLIENTID: ${{ secrets.AZURE_CLIENT_ID }}
        CLIENTSECRET: ${{ secrets.AZURE_CLIENT_SECRET }}
      run: |
        # Connect to Microsoft Graph
        $clientSecret = ConvertTo-SecureString -AsPlainText $env:CLIENTSECRET -Force
        [pscredential]$clientSecretCredential = New-Object System.Management.Automation.PSCredential($env:CLIENTID, $clientSecret)
        Connect-MgGraph -TenantId $env:TENANTID -ClientSecretCredential $clientSecretCredential

        # Install Maester
        Install-Module Maester -Force

        # Install Tests
        Install-MaesterTests -Path ./tests

        # Configure test results
        $PesterConfiguration = New-PesterConfiguration
        $PesterConfiguration.Output.Verbosity = 'None'

        # Run Maester tests
        $results = Invoke-Maester -Path ./tests/Maester/ -PesterConfiguration $PesterConfiguration -OutputFolder test-results -OutputFolderFileName "test-results" -PassThru

        # Add step summary
        $summary = Get-Content test-results/test-results.md
        Add-Content -Path $env:GITHUB_STEP_SUMMARY -Value $summary

        # Flag status to GitHub - Uncomment the block below to fail the build if tests fail
        #if ($results.Result -ne 'Passed'){
        #  Write-Error "Status = $($results.Result): See Maester Test Report below for details."
        #}

    - name: Archive Maester Html Report
      uses: actions/upload-artifact@v4
      if: always()
      with:
        name: maester-test-results-${{ env.NOW }}
        path: test-results
Step-by-step video tutorial
Manually running the Maester tests
To manually run the Maester tests workflow
- Open your
maester-testsGitHub repository and go to Actions - Select Maester Daily Tests from the left pane
- Select Run workflow drop-down from the right pane
- Select Run workflow button to start the workflow
- Select the running workflow to view the status
Viewing test results
- Open your
maester-testsGitHub repository and go to Actions - Select a workflow run to view the results e.g.
Maester Daily Tests
Summary view
The summary view shows the status of the workflow run, the duration, and the number of tests that passed, failed, and were skipped.
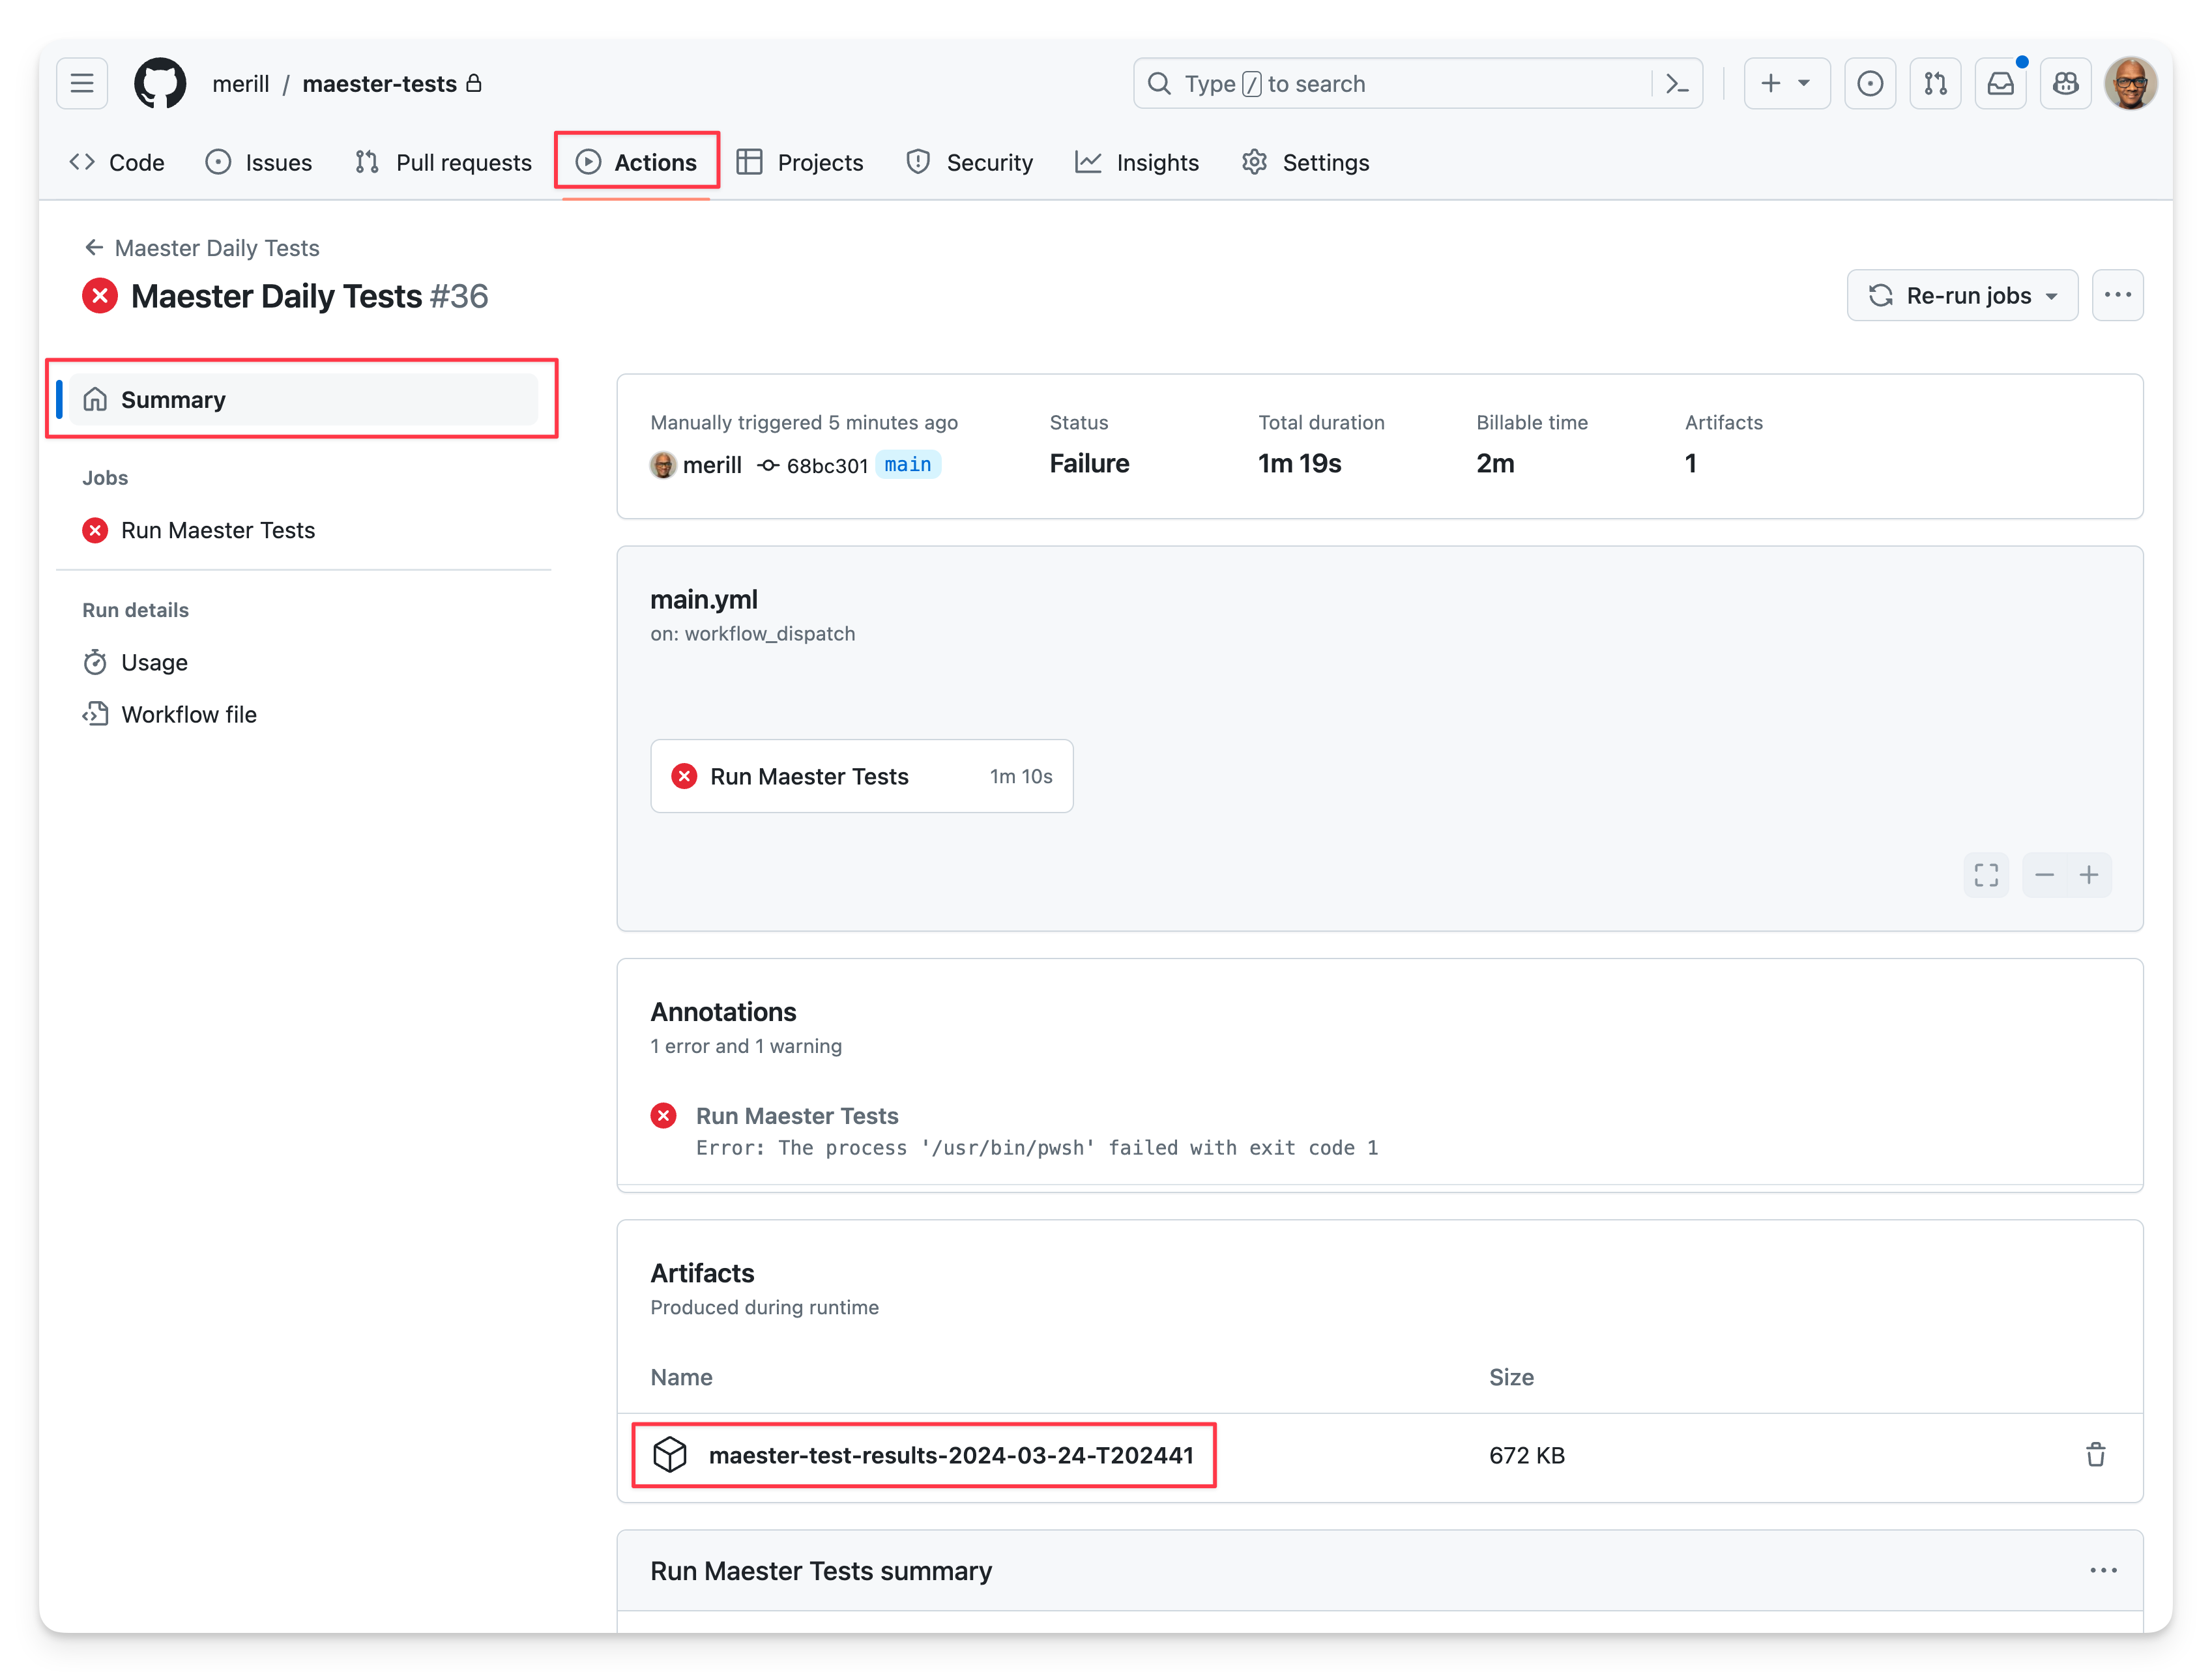
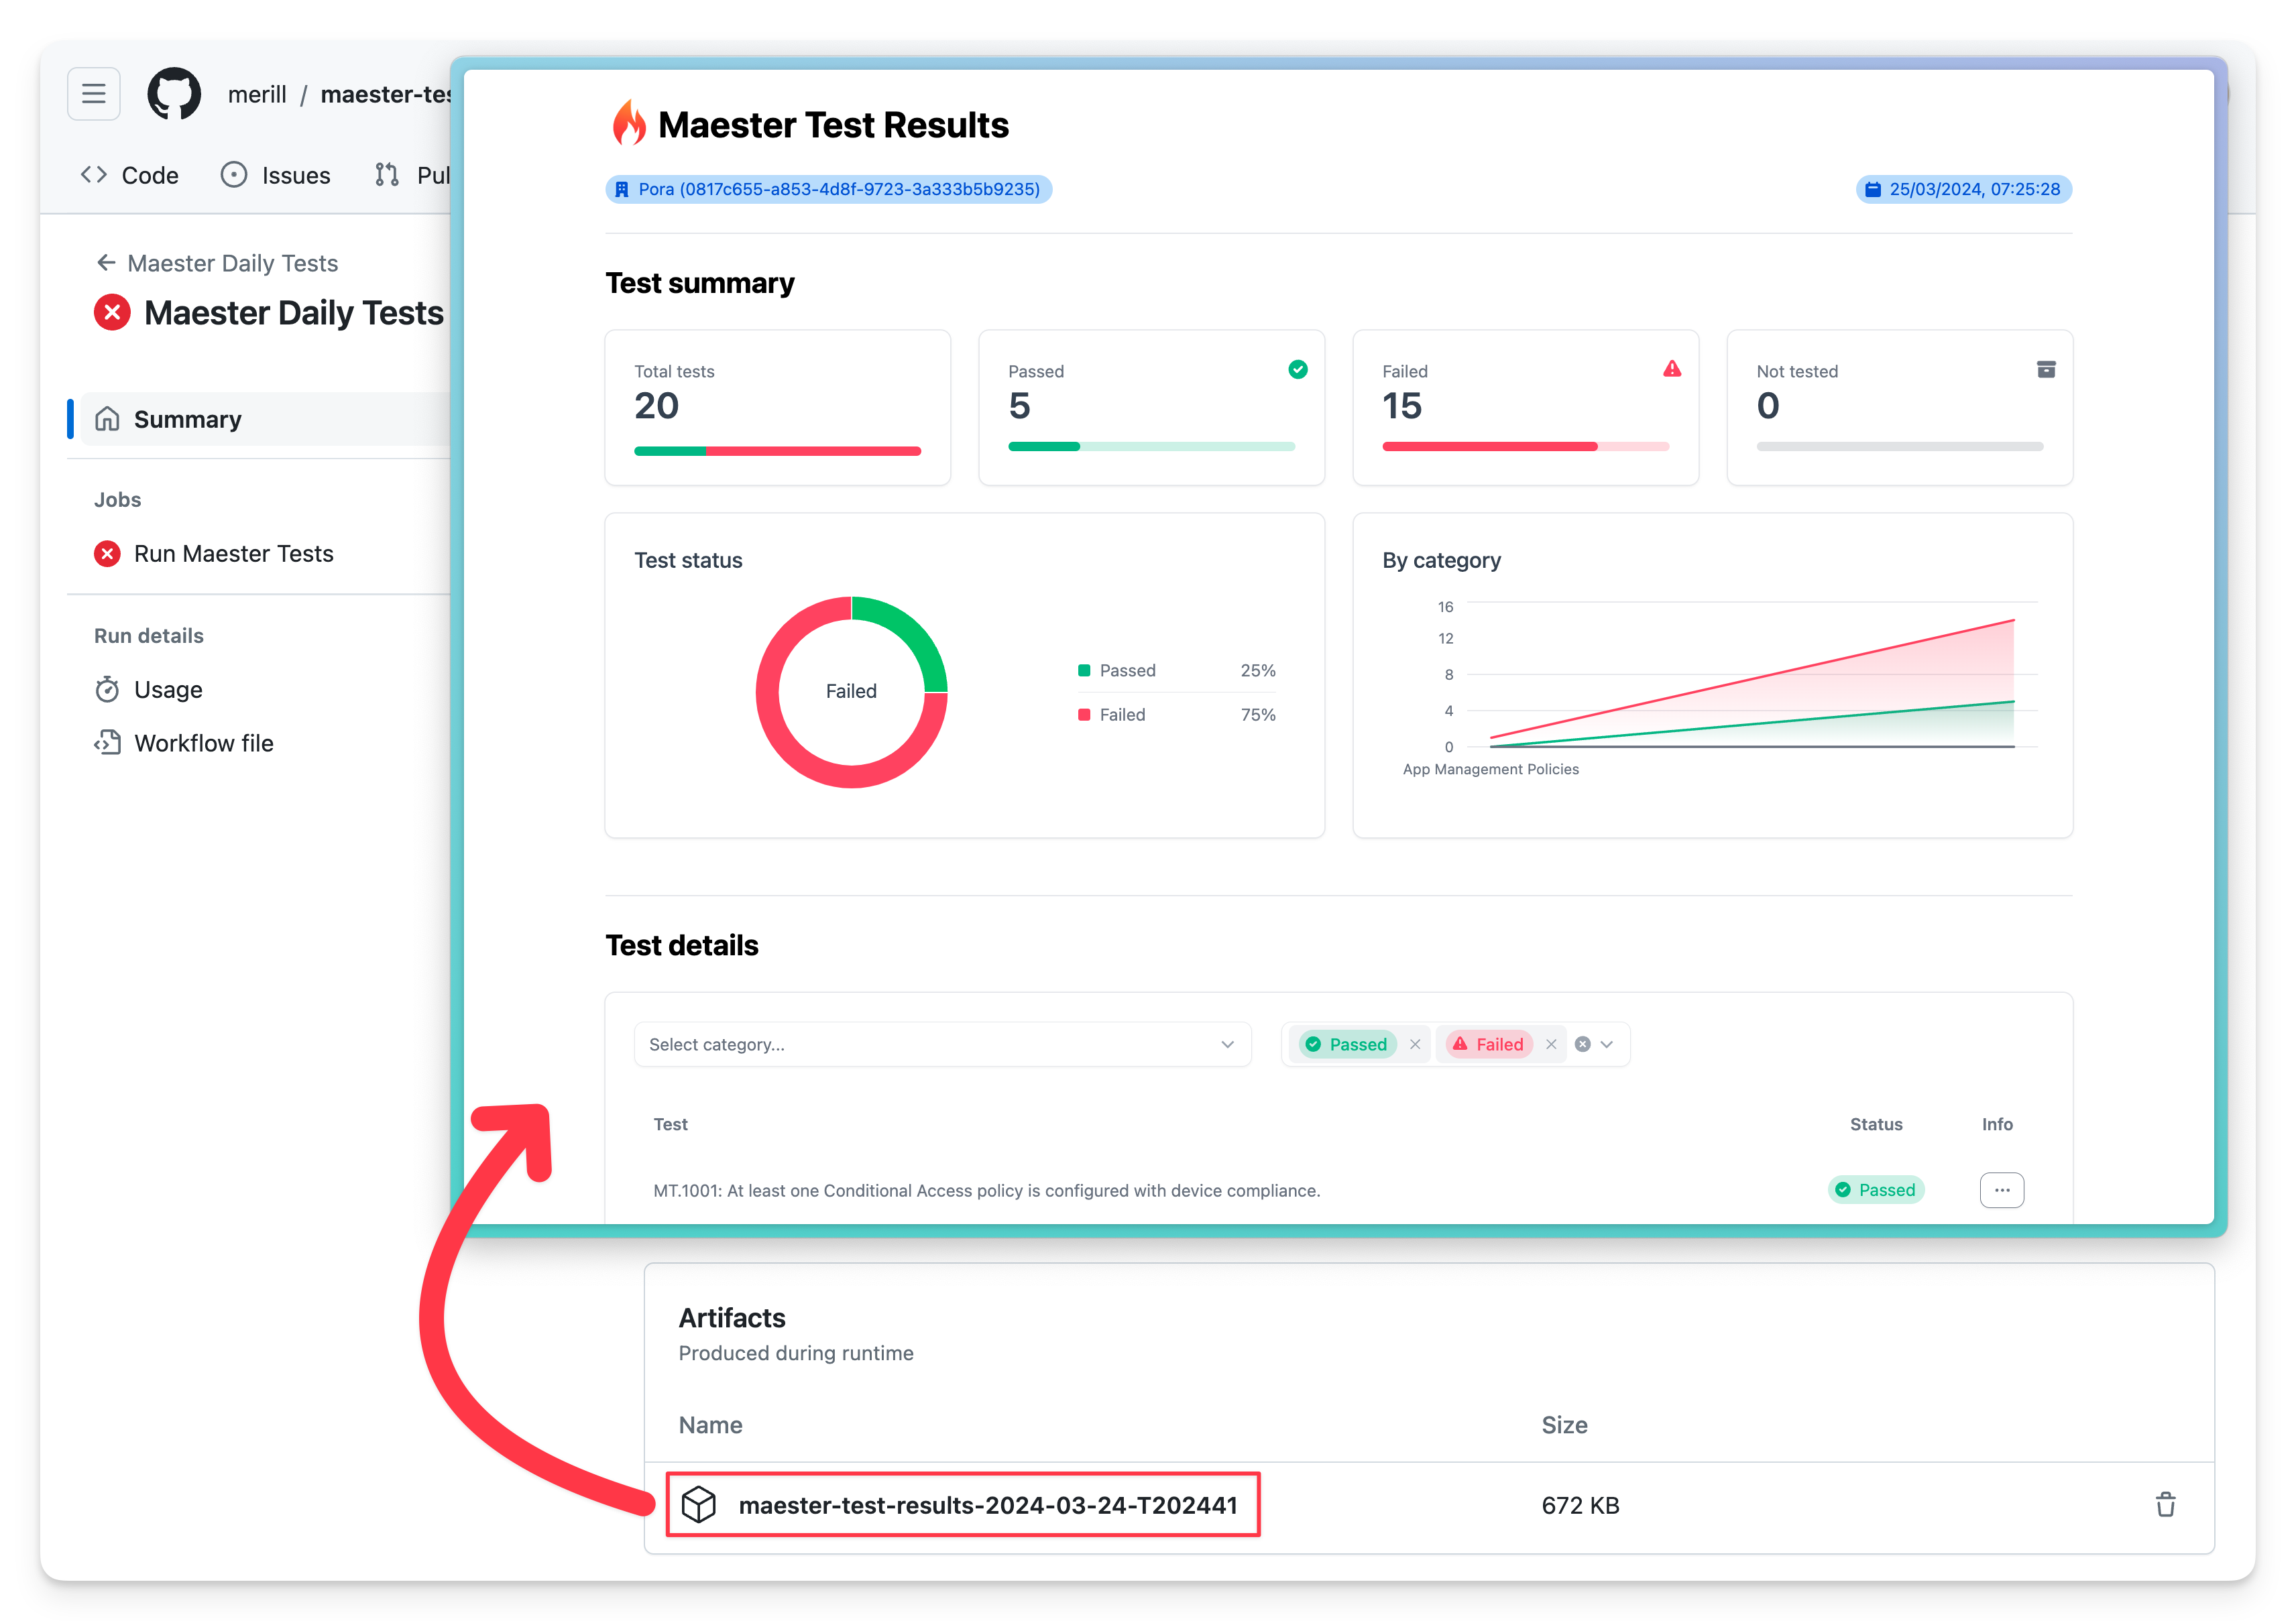
Maester report
The detailed Maester report can be downloaded by selecting the maester-test-results... file from the Artifacts section and opening the test-results.html page.
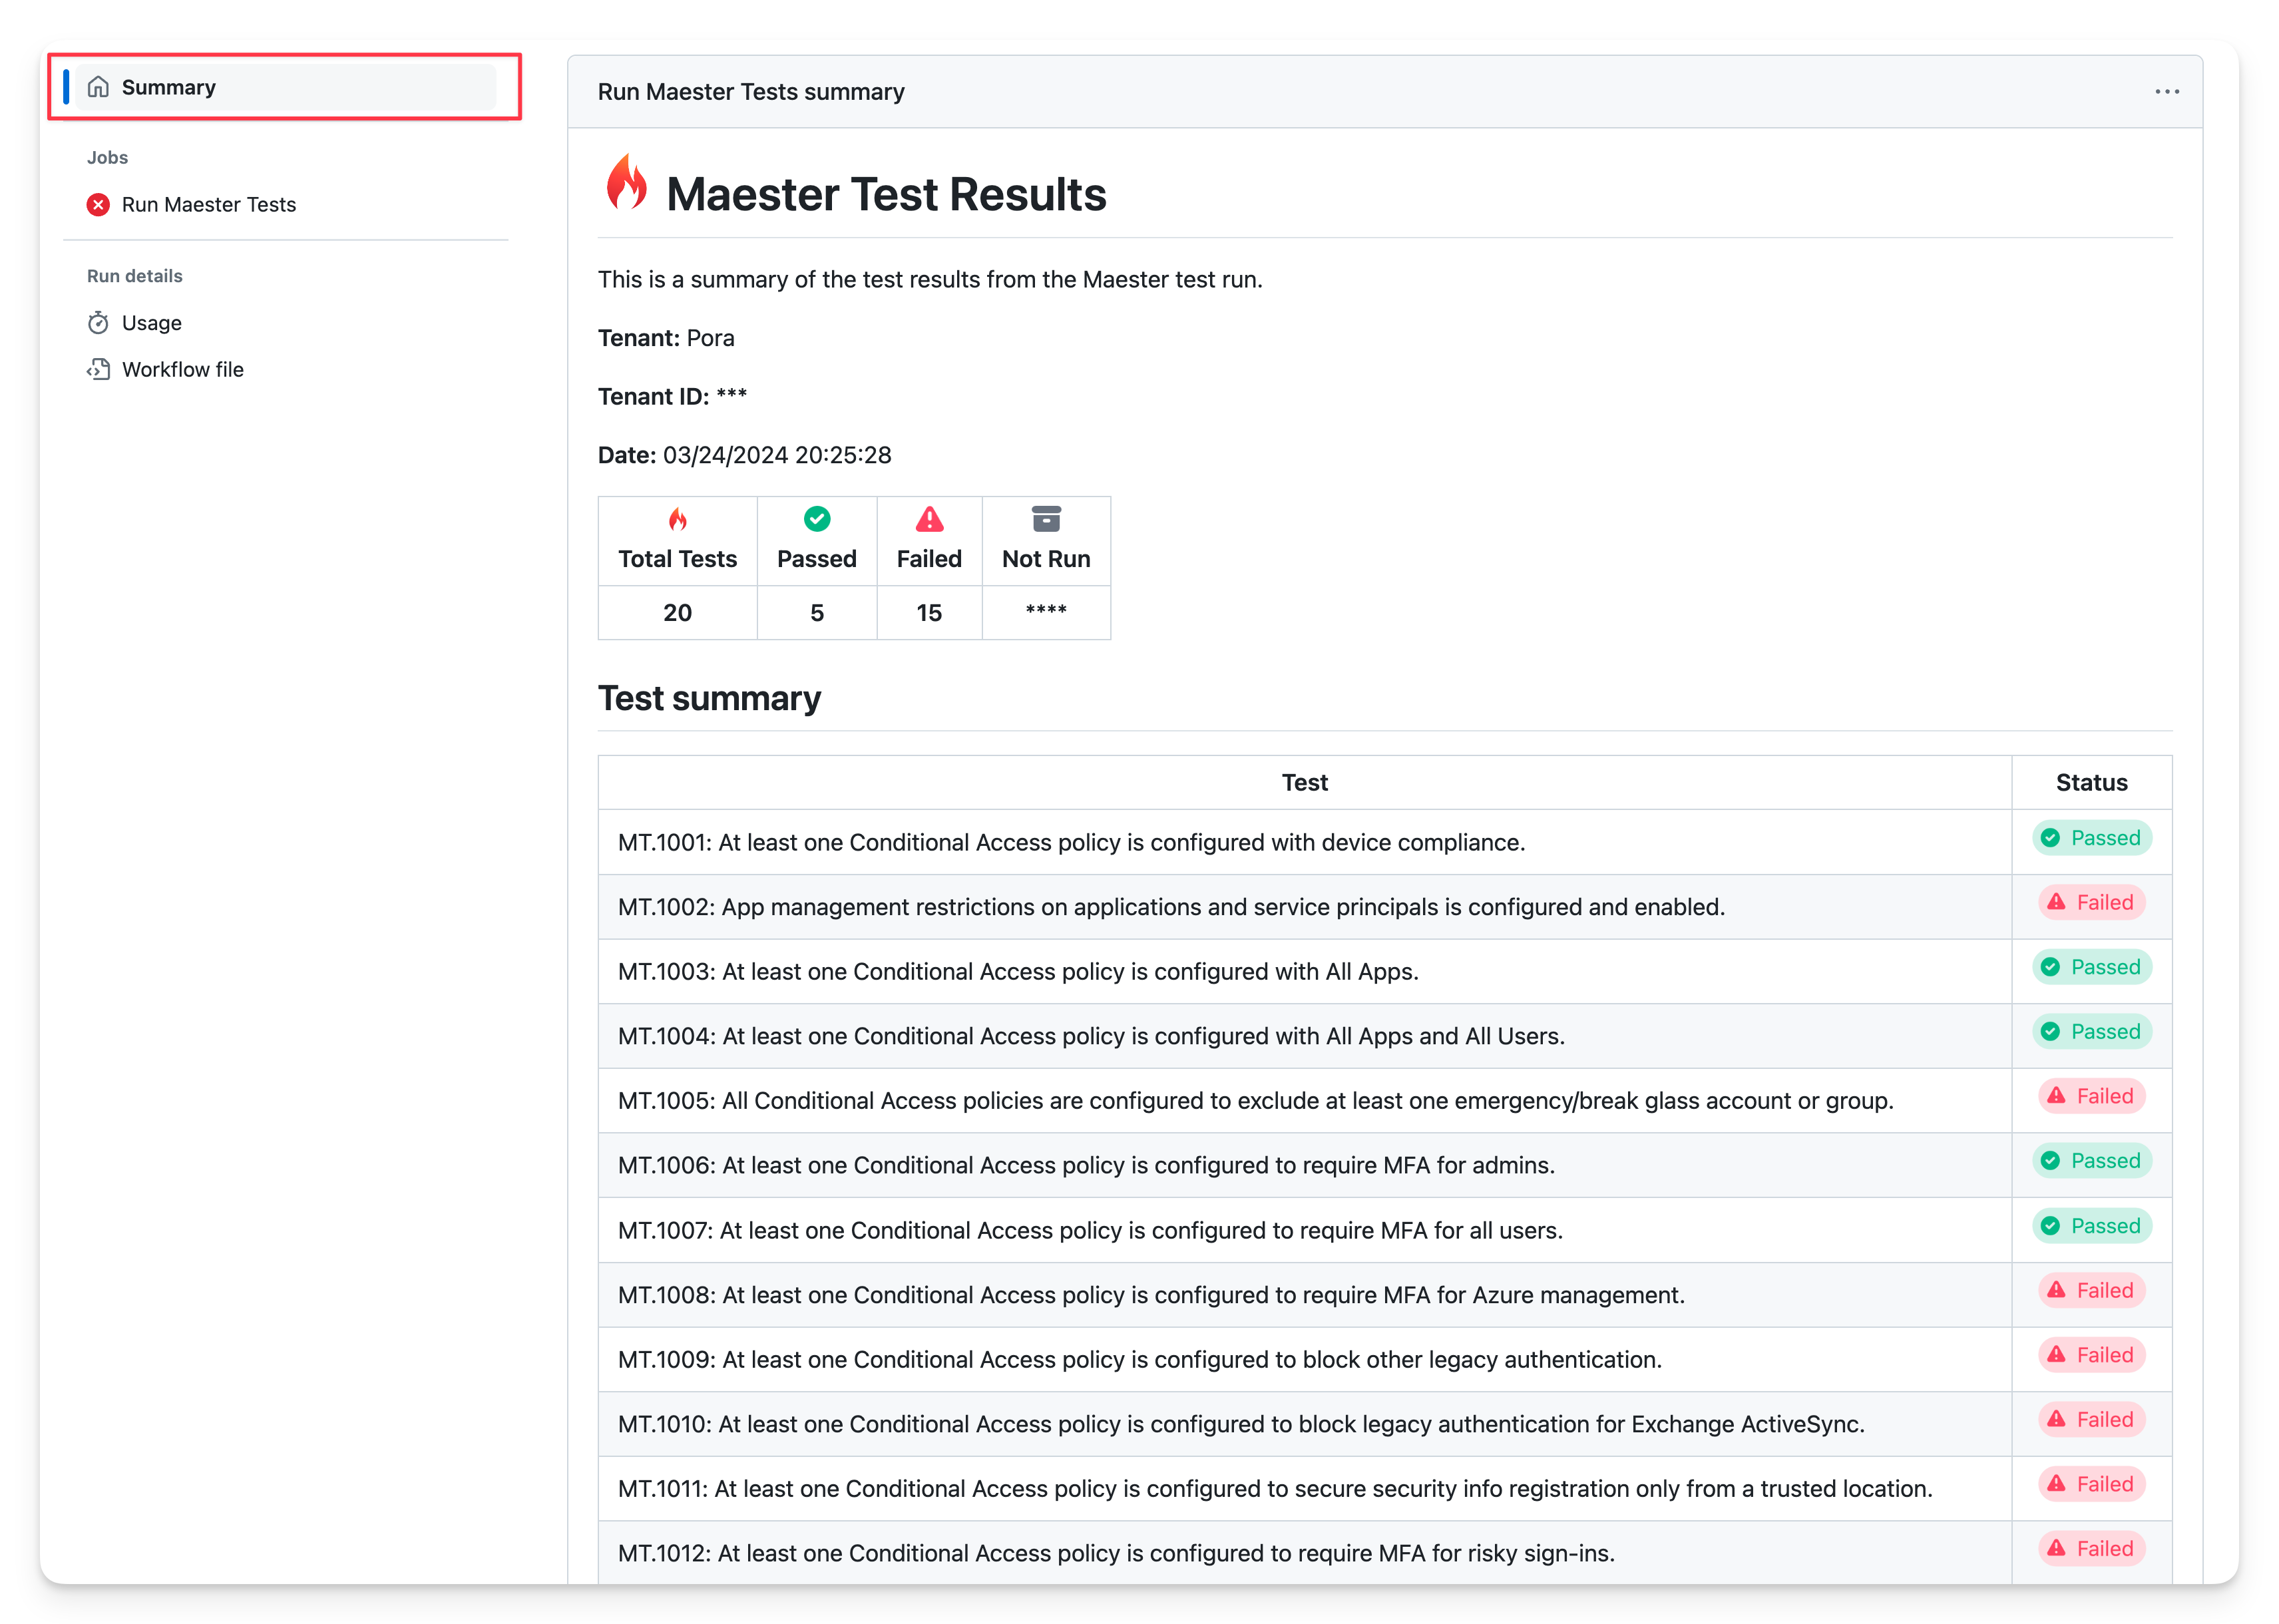
Summary Maester report
A detailed summary of the Maester report can be viewed by scrolling down Summary page.
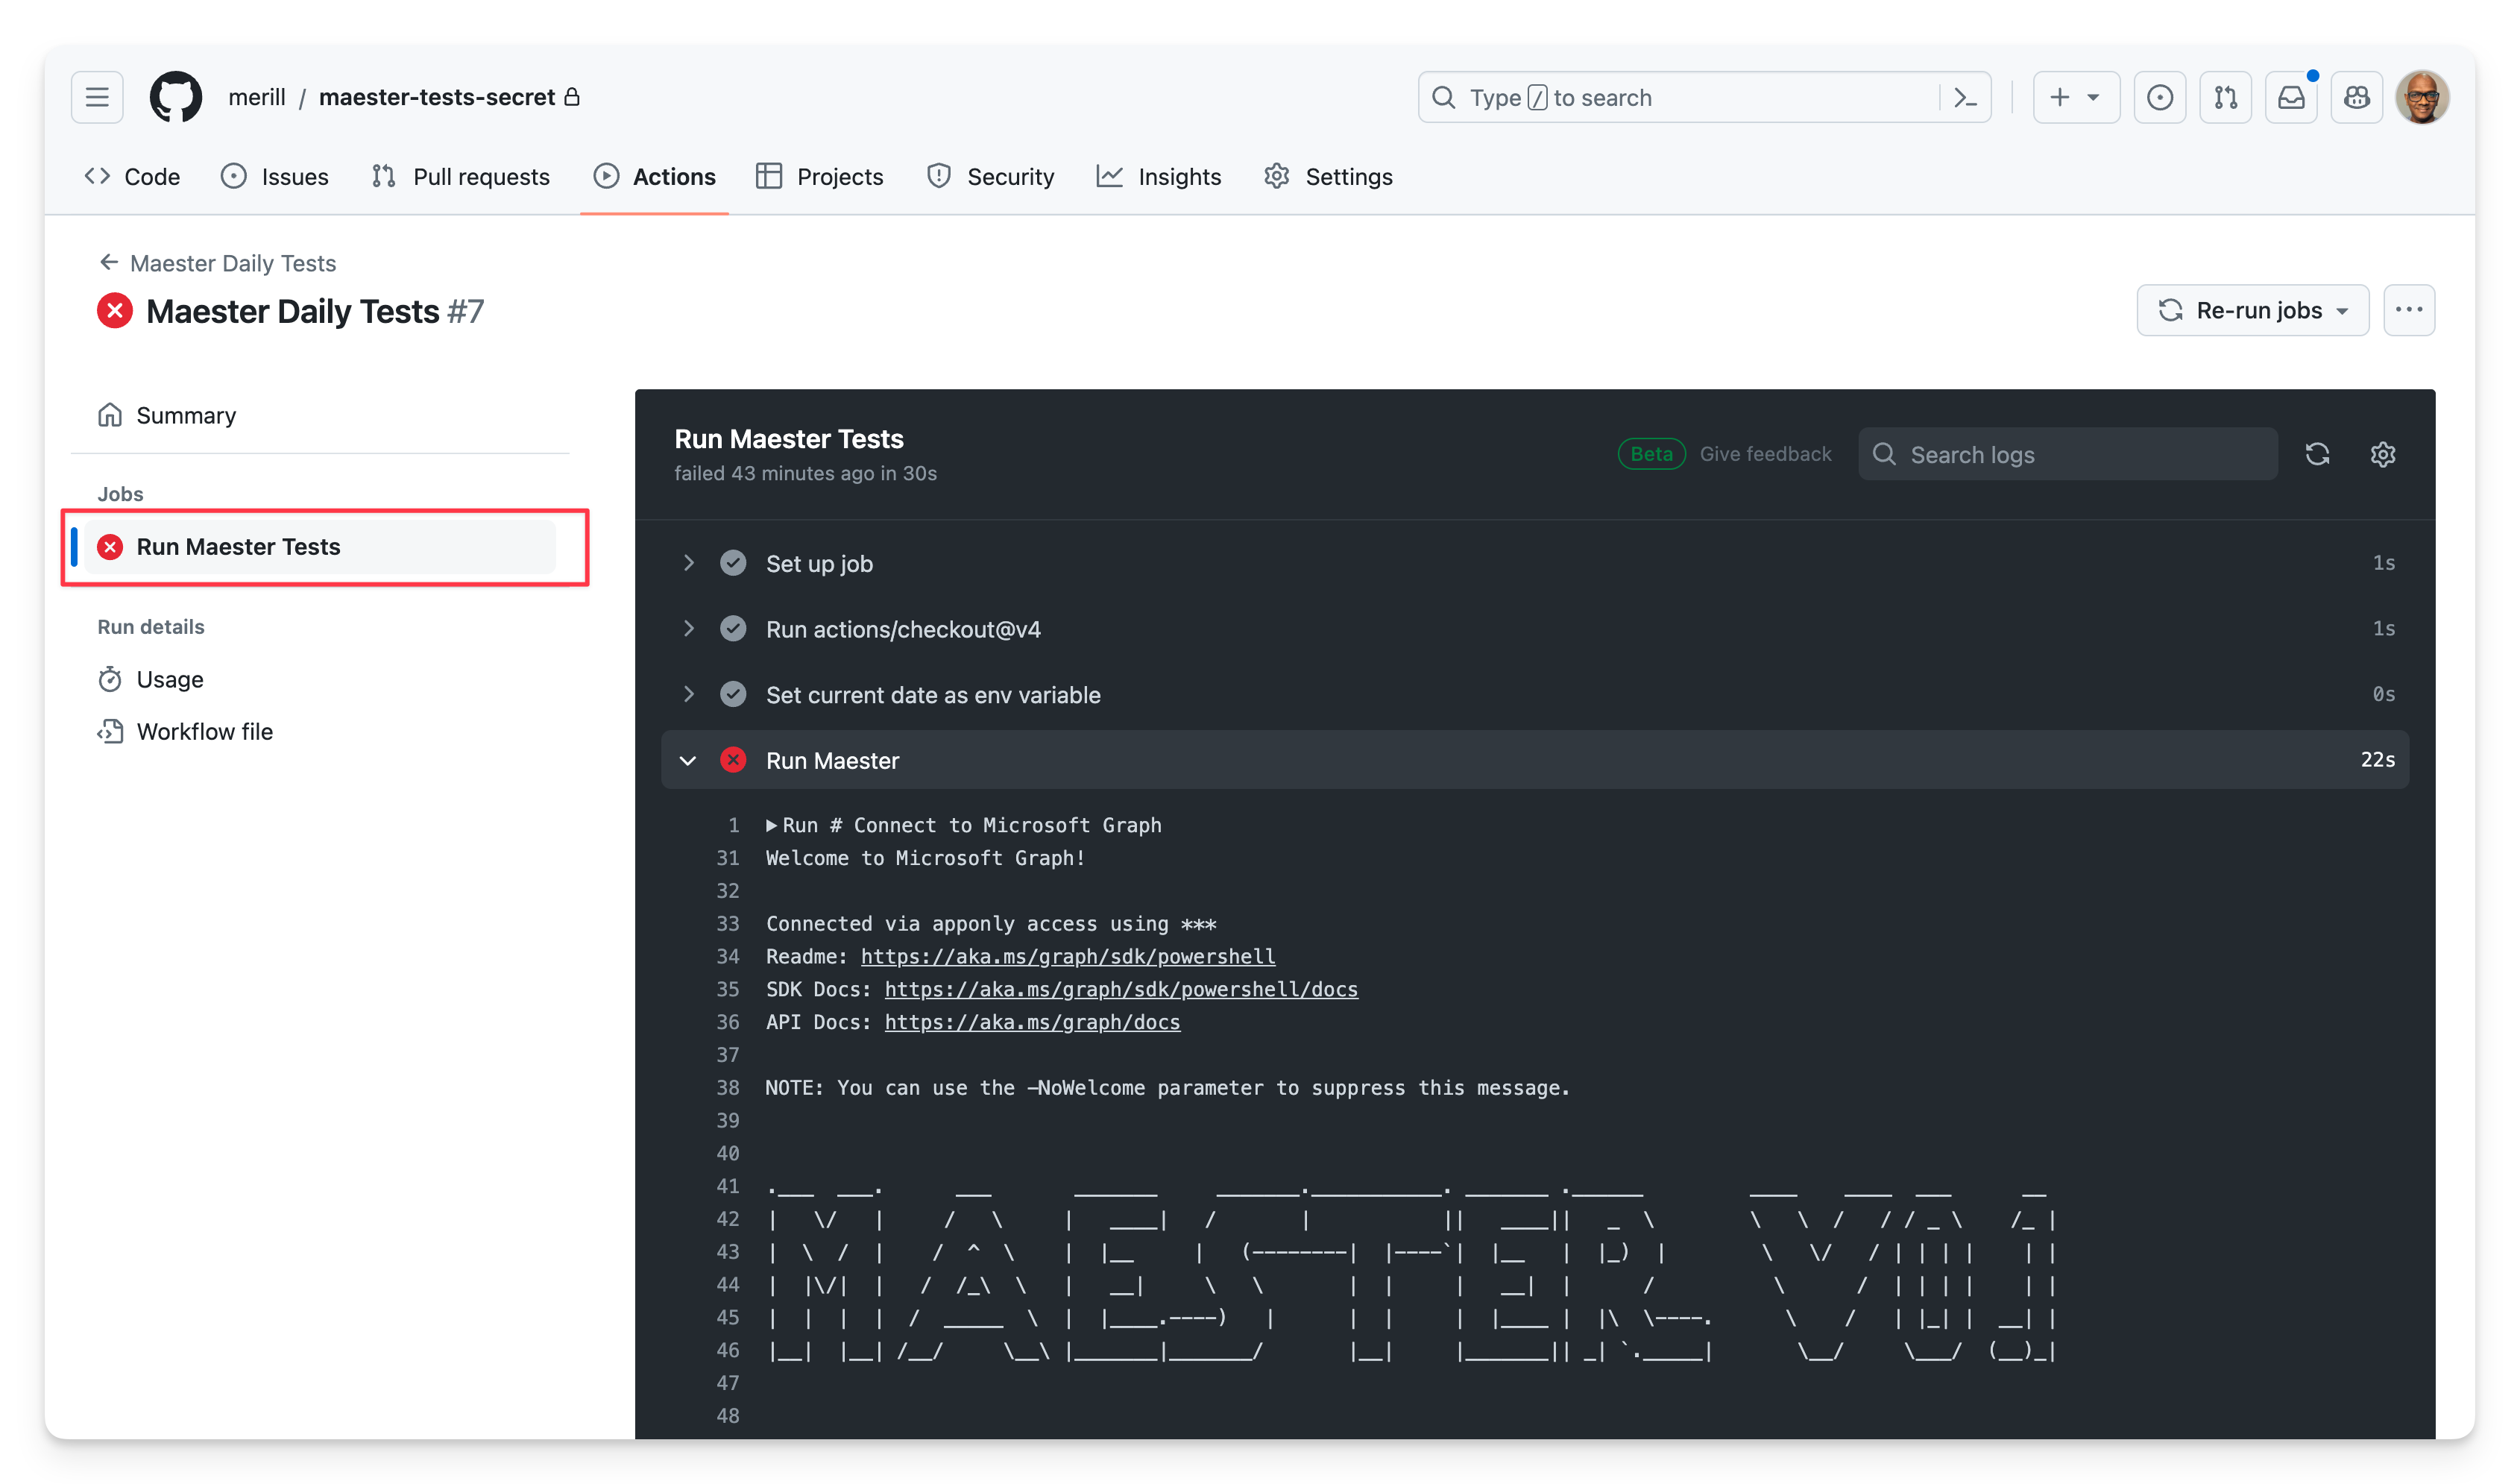
Logs view
Select the Run Maester Tests job from Jobs in the left pane to view the raw logs.
Keeping your Maester tests up to date
The Maester team will add new tests over time. To get the latest updates, use the commands below to update your GitHub repository with the latest tests.
- Clone your fork of the maester-tests repository to your local computer. See Cloning a repository.
- Update the
MaesterPowerShell module to the latest version and load it. - Change to the
maester-tests\testsdirectory. - Run
Update-MaesterTests.
cd maester-tests\tests

Update-Module Maester -Force
Import-Module Maester
Update-MaesterTests